
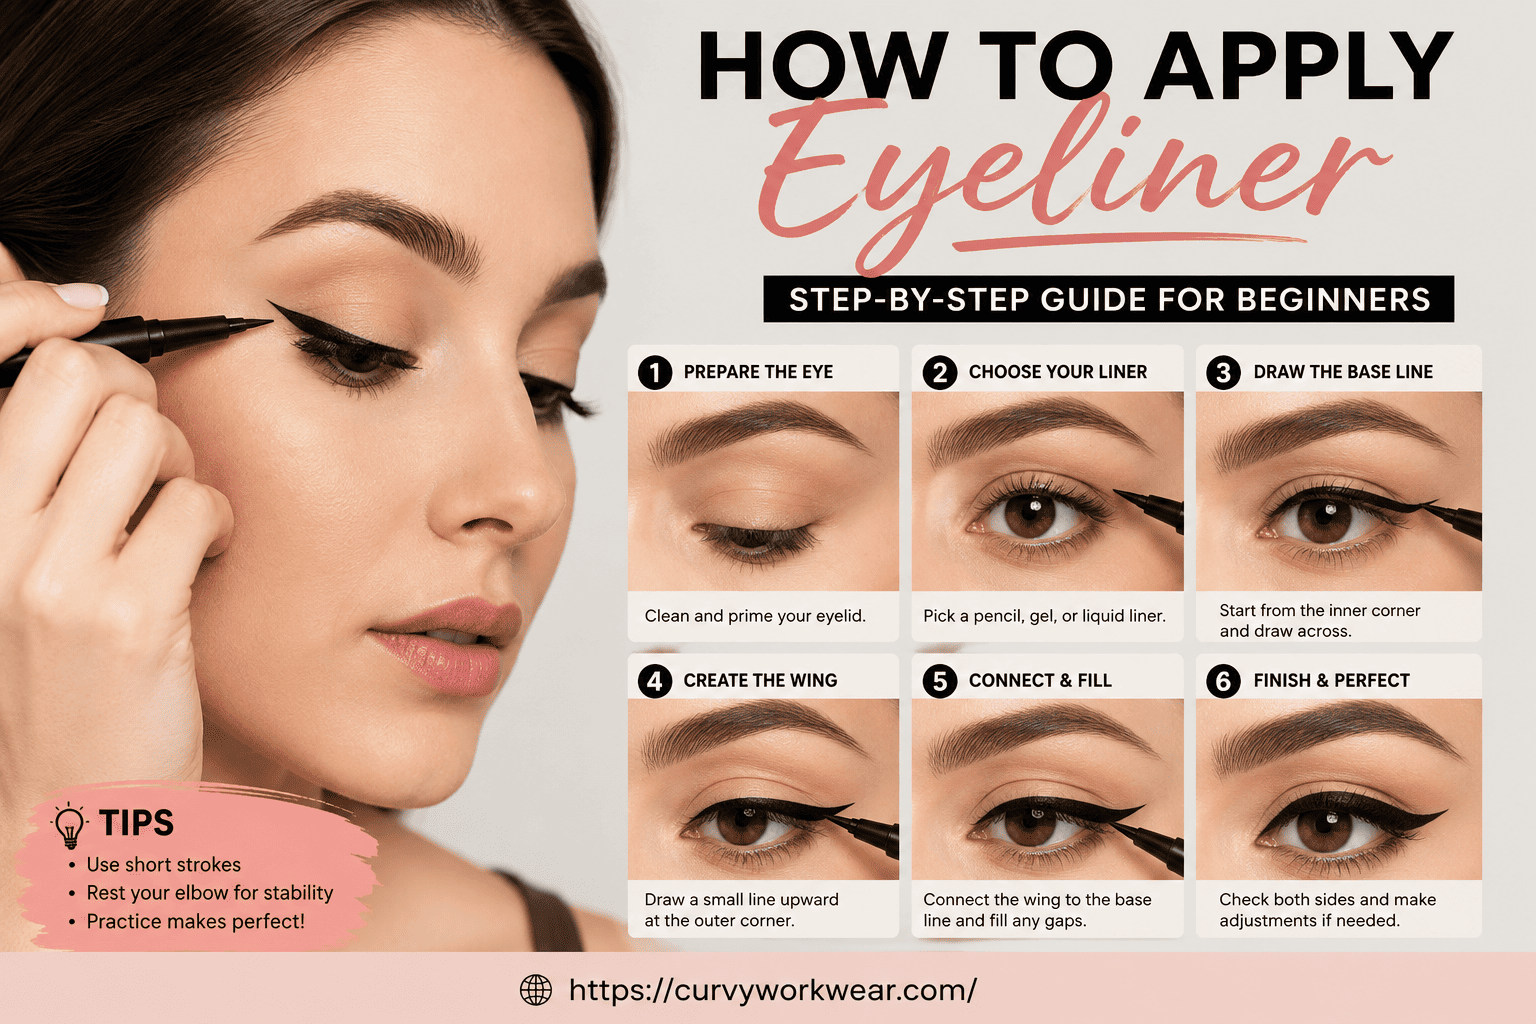
Eyeliner can change the way your eye makeup looks. But many beginners find it hard to apply eyeliner evenly, and getting both eyes to look the same can be a real challenge.
If you have ever wondered how to apply eyeliner without shaky lines or smudges, you are not alone. This guide breaks it down into simple steps anyone can follow, whether you are using a pencil, gel, or liquid formula.
By the end, you will know how to put on eyeliner for your eye shape, how to create a winged eyeliner tutorial look at home, and how to make your liner last all day. Let’s get into it.
Why Eyeliner Is Harder Than It Looks
Eyeliner is not like eyeshadow. There is no room to blend away a mistake.
Your hand needs to be steady, your eyelid needs to stay still, and the product needs to cooperate. That is a lot of moving parts for a beginner.
The good news? Once you understand the basic techniques, eyeliner becomes much easier. It is a skill, and like any skill, it gets better with practice.
The Three Main Types of Eyeliner
Before you start, it helps to know your options. Each type behaves differently.
- Pencil eyeliner – soft, easy to control, great for beginners
- Gel eyeliner – creamy, precise, applied with a small brush
- Liquid eyeliner – bold, sharp lines, but needs a steady hand
Knowing which one suits your skill level will save you a lot of frustration.
What You Need Before You Start
A little prep goes a long way. Gather these items before you begin.
- Your eyeliner of choice (pencil, gel, or liquid)
- A small angled brush (for gel liner)
- Cotton swabs for cleaning up mistakes
- A mirror with good lighting
- Optional: tape or a business card for winged lines
Good lighting matters more than people think. Natural daylight, if you have it, shows you exactly where your line is going.
How to Apply Pencil Eyeliner
Pencil liner is the easiest place to start. It glides on and gives you more control than liquid.
Step 1: Warm Up the Pencil
Rub the tip against the back of your hand a few times. This softens the product slightly, so it glides instead of tugging on your skin.
Step 2: Rest Your Elbow on a Table
This small trick steadies your hand. A shaky arm leads to a shaky line, so give yourself support.
Step 3: Draw Small Dashes, Not One Long Line
Instead of trying to draw the whole line in one stroke, draw small connecting dashes along your lash line. Then go back and fill in any gaps.
Step 4: Set It With Powder
Dust a little translucent powder or matching eyeshadow over the pencil line. This helps it last longer and stops it from smudging.
How to Apply Gel Eyeliner
Gel liner sits between pencil and liquid. It gives you a soft, blendable line but with more staying power than pencil.
Step 1: Dip the Brush Lightly
Use a thin angled brush and dip it into the gel pot. Wipe off the excess on the side of the pot so you do not overload the brush.
Step 2: Start From the Middle of the Lid
Many beginners find it easier to start in the middle of the eye, then work toward the inner and outer corners. This helps keep the line even.
Step 3: Build the Line in Thin Layers
Do not try to get a thick line in one pass. Apply a thin layer first, then go over it again if you want more intensity.
Step 4: Clean Up With a Cotton Swab
Dip a cotton swab in a little makeup remover to fix any uneven spots before the gel sets completely.
How to Apply Liquid Eyeliner
Liquid liner gives the boldest, most precise look. However, it also takes the most practice, so patience is key here.
Step 1: Pull Your Eyelid Taut
Gently pull the outer corner of your eyelid to smooth out the skin. This gives you a flatter surface to draw on.
Step 2: Start With a Thin Line
Begin close to your lash line with a thin stroke. You can always add more product, but it is hard to remove excess liquid liner once it sets.
Step 3: Work in Small Sections
Break the line into three parts: inner corner, middle, and outer corner. Connect them once each section looks even.
Step 4: Blink to Check Your Work
Look down into a mirror, then blink normally. This shows you how the line actually looks when your eye is open, not just when it is stretched.
Winged Eyeliner Tutorial: Step by Step
A winged eyeliner tutorial does not have to be intimidating once you break it into steps. This is one of the most searched eyeliner styles, and for good reason. It instantly lifts the eye.
Step 1: Find Your Angle
Look at the natural angle of your lower lash line. Imagine extending that line up and out toward the end of your eyebrow. That is your wing guide.
Step 2: Draw the Wing First
Draw a small line from the outer corner of your eye toward that guide point. This creates the tip of your wing before you fill in the rest.
Step 3: Connect the Wing to Your Lash Line
Draw a line from the tip of the wing back to the middle of your eyelid, connecting it to your existing liner.
Step 4: Fill In the Triangle
You will notice a small triangle shape between the wing and your lash line. Fill this in completely for a clean, solid wing.
Cat Eye Eyeliner Tutorial: A Slight Variation
A cat eye eyeliner tutorial follows the same basic steps as a winged look, but with one difference. The wing is sharper, and the line is usually thicker at the outer corner, tapering down toward the inner eye. Some people also add a small flick at the inner corner for a fuller cat eye effect.
Eyeliner for Almond Eyes and Other Shapes
Eyeliner for almond eyes is often considered the easiest shape to work with because almond eyes are balanced in width and height. Still, technique matters.
Almond Eyes
You can follow almost any eyeliner style here. A classic wing or a thin line along the lash line both work well, since this eye shape naturally supports most looks.
Round Eyes
Extend the liner slightly past the outer corner. This creates an elongated effect and makes round eyes look more oval.
Hooded Eyes
Apply liner with your eyes open, not closed. This helps you see exactly where the line will show once your eye is fully open, since hooded lids can hide liner drawn with closed eyes.
Downturned Eyes
Focus the wing on lifting the outer corner upward. This helps counter the natural downward angle and gives a more lifted appearance.
Long-Lasting Eyeliner Techniques
Nobody wants their eyeliner to fade or smudge halfway through the day. These long-lasting eyeliner techniques can help.
- Use an eyeshadow primer first. This creates a smoother base and helps the liner grip better.
- Set liquid or pencil liner with a matching eyeshadow. Pat it gently over the line with a small brush.
- Avoid touching your eyes throughout the day. Oils from your fingers can break down the product.
- Choose waterproof formulas for humid weather or long days. They tend to hold up better against sweat and oil.
- Let each layer dry before adding more product. This is especially important with gel and liquid liner, so they do not smudge together.
Best Eyeliner Techniques 2026: What’s Trending
Eyeliner trends shift a bit each year, but a few approaches are especially popular right now. Graphic liner, where you use bold, exaggerated shapes instead of a traditional line, continues to grow. Soft, smudged liner looks paired with a sharp wing are also popular, blending a smoky effect with definition.
Colored liners, such as brown, navy, and deep green, are being used more often as a subtle alternative to classic black. Keep in mind that trends change, so it is worth checking current sources for the latest looks each season.
FAQ: Common Questions About Applying Eyeliner
What is the easiest eyeliner for beginners?
Pencil eyeliner is generally the easiest for beginners. It is soft, forgiving, and easier to control than liquid or gel formulas.
How do I stop my eyeliner from smudging?
Use a primer before applying liner, and set it with a matching powder eyeshadow. Avoid touching your eyes during the day, and consider a waterproof formula if you have oily eyelids.
How can I fix a mistake without redoing my whole eye?
Dip a cotton swab in makeup remover and gently clean up the edges of the mistake. Then use a small amount of concealer to sharpen the line if needed.
Should I apply eyeliner before or after eyeshadow?
Most people apply eyeshadow first, then eyeliner. This way, any eyeshadow fallout does not ruin your clean liner line.
How do I make both eyes look symmetrical?
Use a small piece of tape or a business card as a guide for your wing angle on each eye. Also, try to sit up straight and look forward in the mirror, instead of tilting your head, since this keeps the angle consistent between both sides.
Conclusion
Learning how to apply eyeliner takes practice, but it is a skill anyone can build with time. Start with a pencil if you are new to this, move on to gel once you feel steady, and try liquid liner when you are ready for a bolder look.
Whether you are working on a winged eyeliner tutorial, exploring a cat eye eyeliner tutorial, or simply want long-lasting eyeliner techniques that get you through the day, the key is patience and practice. Try one new technique at a time, and do not worry about getting it perfect on your first attempt.