Introduction
Craving that thick, creamy cold foam from your favorite coffee shop? You don’t need to leave your kitchen to get it.
Cold foam looks fancy. But it’s surprisingly simple to make. Most recipes assume you own a milk frother. What if you don’t?
Good news: you don’t need one. If you’re wondering how to make cold foam without any special equipment, this guide walks you through an easy method. It uses tools you probably already have. A jar, a whisk, a blender, or even a French press will get the job done.
By the end of this article, you’ll know exactly how to make cold foam at home. You’ll learn which ingredients matter, how long it lasts, and how to fix common mistakes. Let’s get started.
What Is Cold Foam, Anyway?
Cold foam is a light, airy layer of milk (or milk and cream) that sits on top of iced coffee. It’s made by whipping air into cold liquid. This makes it thicken and double or triple in size.
This creates a thick, pillowy texture. It floats on top of your drink instead of mixing straight in. As you sip, it slowly blends into the coffee below.
Coffee shops made cold foam popular, especially as a topping for cold brew. However, you don’t need a barista or a fancy machine to enjoy it at home. You just need cold liquid and a way to whip air into it.
Cold Foam vs. Sweet Cream Cold Foam
Plain cold foam is usually just milk, whipped until frothy. Sweet cream cold foam is a richer version. It’s made by blending milk with a splash of heavy cream and a sweetener.
The added cream makes the foam thicker. It also holds its shape on top of your drink longer. That’s the real difference between “cold foam” and “sweet cream cold foam” on a coffee shop menu.
Cold Foam vs. Regular Milk Foam
Regular steamed milk foam, like on a cappuccino, is made with heat. Cold foam is made entirely with cold liquid. No heat is involved at all.
Heat isn’t used because it would melt the ice in your drink. Cold foam keeps your iced coffee properly cold, while still giving you that creamy top layer.
Why You Don’t Need a Frother to Make Cold Foam
Electric frothers work by spinning a small whisk very fast. But here’s the secret: any method that adds enough air to milk will create foam.
A frother just makes the job faster. It doesn’t do anything magical that your arm, a jar, or a blender can’t do too.
In short, you’re trapping tiny air bubbles inside milk proteins. Milk contains a protein called casein, and casein is what holds those air bubbles in place once they form. That’s the actual science behind foam.
So if you shake, whisk, or blend milk hard enough, you’ll get a similar result. It just takes more effort. The type of milk you use also changes how well it works.
Advantages and Disadvantages of Making Cold Foam at Home
Before you try this easy cold foam recipe, it helps to know the trade-offs.
Advantages:
- Costs far less than buying cold foam drinks daily
- No need to buy a separate frother
- You control the sweetness and flavor
- Works with dairy or plant-based milk
- Takes less than five minutes
Disadvantages:
- Takes more physical effort than an electric frother
- Texture can be less consistent than a machine-made foam
- Some methods work poorly with certain milk types
- Foam doesn’t last as long as it would fresh from a frother
- Overdoing it with cream can turn foam into whipped cream by accident
Weighing these points helps you pick the right method for your kitchen and your patience level.
What You’ll Need for Cold Foam Without a Frother
You probably already have everything on this list at home.
Ingredients
- Cold milk or a mix of milk and heavy cream
- Sweetener (optional): sugar, honey, maple syrup, or flavored syrup
- Vanilla extract or a pinch of salt (optional, for flavor)
- A pinch of instant coffee (optional, for coffee-flavored foam)
Tools (pick one)
- A mason jar with a tight lid
- A whisk
- A French press
- A hand mixer or immersion blender
- A small blender
You don’t need all of these. Just pick whichever one you have on hand.
Which Milk (or Cream) Works Best for Cold Foam?
This is the part most guides skip. It makes a real difference in your results.
Skim or Nonfat Milk
Skim milk foams up light and bubbly. It’s closer to cappuccino-style foam. It’s airy, but it doesn’t hold its shape for long once poured over coffee.
Whole Milk or 2% Milk
These milks have more fat. That gives you a creamier, silkier foam. Many home cooks find this the best balance between texture and ease.
Milk Plus Heavy Cream
Mixing milk with a splash of heavy cream gives you a thicker, richer foam. Use roughly equal parts, or slightly more milk than cream. This is closer to the “sweet cream” style served at coffee shops, and it holds up well no matter which tool you use.
Heavy Cream Alone
Straight heavy cream makes a very rich, thick foam. Be careful not to overwhip it. It can quickly turn into whipped cream instead of foam. If that happens, thin it out with a splash of milk.
Plant-Based Milk
If you use plant-based milk, look for a “barista blend” oat milk if you can find one. These are formulated with extra thickeners that help them foam better than regular oat milk. Almond and soy milk can work too, but results vary a lot by brand.
Easy Cold Foam Recipe: 4 Simple Methods
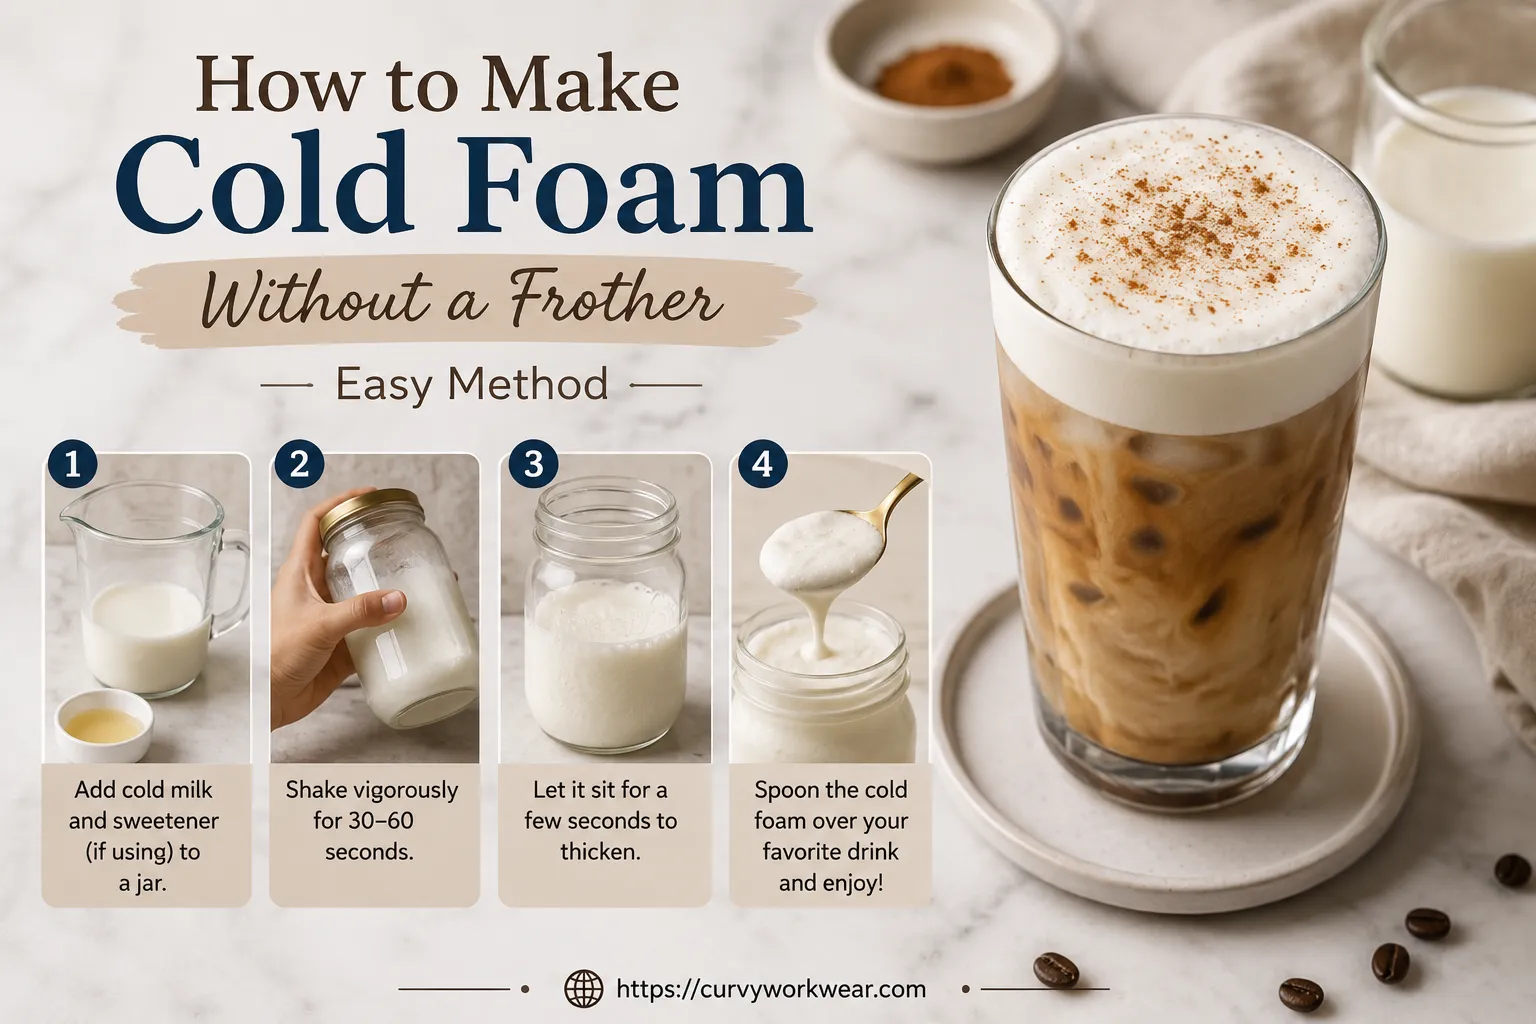
Here are four ways to make cold foam at home. Pick the one that matches what’s already in your kitchen. As a starting point, about ¼ cup of milk (or milk plus cream) with a small spoonful of sweetener is enough for one drink.
Method 1: The Jar Shake Method (No Tools Needed)
This is the easiest way to make cold foam if you own nothing but a jar with a lid.
- Pour ¼ cup of cold milk into a mason jar, filling it no more than a third full.
- Add sweetener or vanilla extract if you want flavored foam.
- Close the lid tightly.
- Shake hard for 45 to 60 seconds. You’ll feel the milk get thicker as you shake.
- Open the lid and spoon the foam on top of your iced coffee.
Shaking forces air into the milk again and again. It tends to produce a light, bubbly foam, especially with lower-fat milk.
Method 2: The Whisk Method
If you have a regular kitchen whisk, this works well too. Use a metal or glass bowl rather than ceramic. A whisk can scratch a ceramic surface.
- Pour cold milk (or milk and cream) into the bowl.
- Add sweetener if desired.
- Whisk quickly in a circular motion for 1 to 2 minutes.
- Keep going until the mixture roughly doubles in size and looks foamy.
This method takes more arm work than shaking. But it tends to give a smoother, creamier foam, especially when cream is part of the mix.
Method 3: The Blender Method
A regular blender or an immersion blender can whip up a large batch quickly.
- Pour cold milk (or milk and cream) into the blender.
- Add sweetener if desired.
- Blend on high for 30 to 45 seconds.
- Check the texture. If it’s too thin, blend a little longer in short bursts.
Be careful not to over-blend, especially with heavy cream in the mix. Blend in short 10-second bursts near the end.
Method 4: The French Press Method
A French press is one of the best non-frother tools for this job, even though it’s not designed for it.
- Pour cold milk into the French press, filling it less than halfway.
- Add sweetener if you like.
- Pump the plunger up and down quickly for about 20 to 30 seconds.
- Check the foam. If it’s not thick enough, keep pumping in short bursts.
The French press’s fine metal mesh creates small, even bubbles fast. Many people find this method gets closest to what a frother produces.
Tips for the Best Homemade Cold Foam
Use Cold, Not Room-Temperature Milk
Cold milk holds air bubbles better than warm milk. Always chill your milk before you start.
Match Your Milk to Your Tool
Lower-fat milk tends to foam best in a blender. Milk with more fat, or milk mixed with cream, often foams beautifully with a hand whisk. Try a couple of pairings to see what you like.
Don’t Overfill Your Container
Foam expands as you shake, whisk, or blend it. Fill your jar, bowl, or French press only about a third full.
Add Sweeteners and Flavors Before Foaming
Mix in sugar, syrup, or vanilla before you whip it. This helps the flavor blend evenly. A small pinch of salt is also worth trying if you like a sweet-and-salty flavor.
Pour Slowly
When you top your coffee, pour the foam on gently instead of dumping it in. A slow pour helps it sit on top longer.
Flavor Variations for Your Cold Foam Recipe
Once you’ve got the base method down, flavoring is easy. Mix any of these into your milk before whipping:
- Vanilla: a splash of vanilla extract or vanilla syrup
- Caramel or salted caramel: caramel sauce plus a small pinch of sea salt
- Chocolate: a spoonful of cocoa powder or chocolate syrup
- Brown sugar: brown sugar dissolved in a splash of warm water, then cooled
- Cinnamon or pumpkin spice: a pinch of ground spice
- Matcha: a small amount of matcha powder plus a little sweetener
Common Mistakes to Avoid When Making Cold Foam
Using Milk That’s Too Warm
Warm milk won’t foam as well. If your milk has been sitting out, chill it for a few minutes first.
Not Whipping It Long Enough
Foam takes patience. If your foam looks thin, keep going for another 15 to 30 seconds.
Overdoing It With Cream
Whipping heavy cream too long can turn your cold foam into whipped cream. Check the texture often. Stop as soon as it looks thick and pourable rather than stiff.
Using the Wrong Container Size
A jar or bowl that’s too small won’t give the mixture room to expand. A standard mason jar (about 8 to 16 ounces) usually works well for a single serving.
How to Use Your Cold Foam
- Make your cold brew or iced coffee as usual.
- Fill the glass with ice, then pour in the coffee, leaving about an inch of space at the top.
- Spoon or slowly pour the cold foam on top. Don’t stir it in right away.
- Sip through the foam layer for that classic coffee-shop feel.
For extra flair, sprinkle cinnamon, cocoa powder, or a drizzle of caramel on top.
How Long Does Homemade Cold Foam Last?
Cold foam tastes and looks best fresh, right before you serve it. That said, you have some flexibility.
Store leftover foam in an airtight container in the fridge. It will hold its texture reasonably well for up to 24 hours, though it loses some airiness over time. Since cold foam is dairy-based, treat it the way you would treat any other milk product; check general cold food storage guidelines if you’re unsure how long dairy stays safe in your fridge.
If your unfrothed milk mixture hasn’t been whipped yet, it can sit in the fridge for a few days before you froth it. When you’re ready, just give it another shake, whisk, or blend.
FAQ: How to Make Cold Foam
Can I make cold foam without a frother?
Yes. You can shake milk in a jar, whisk it by hand, blend it, or use a French press. All of these methods add enough air to create foam, just like an electric frother does.
What is the best milk for cold foam?
Whole milk, 2% milk, or a mix of milk and a little heavy cream usually creates the thickest, creamiest foam. Skim milk works well too, especially in a blender. Oat milk is the best plant-based option, ideally a barista-style blend.
How long does homemade cold foam last?
Cold foam is best fresh. Leftover foam can be stored in an airtight container in the fridge for up to about 24 hours. Give it a quick reshake before using it again.
Why isn’t my cold foam getting thick?
Your milk might be too warm, or you may not have whipped it long enough. Chill your milk first. If it’s still thin after a full minute, try adding a small splash of heavy cream.
Can I use flavored syrups in cold foam?
Yes. Mix in vanilla, caramel, or any flavored syrup before shaking, whisking, or blending. This spreads the flavor evenly instead of leaving it just at the top.
Conclusion
Learning how to make cold foam without a frother is easier than most people expect. All you really need is cold milk, or milk with a little cream, and some shaking, whisking, blending, or pumping.
Whether you use a mason jar, a whisk, a blender, or a French press, you can get that same creamy, café-style foam at home. Try a few methods and see which one fits your morning routine best.
Once you get the hang of it, making cold foam at home becomes second nature. Give it a try tomorrow morning and top off your iced coffee like a pro.
Disclaimer: This article is for general informational purposes only. It is not professional food safety or medical advice. Always follow standard food safety practices when handling dairy at home.