Why Layering Feels Harder When You’re Plus Size (And How to Fix It)
Layering sounds easy. Add a jacket. Add a scarf. Done, right?
But for plus size bodies, it’s not that simple.
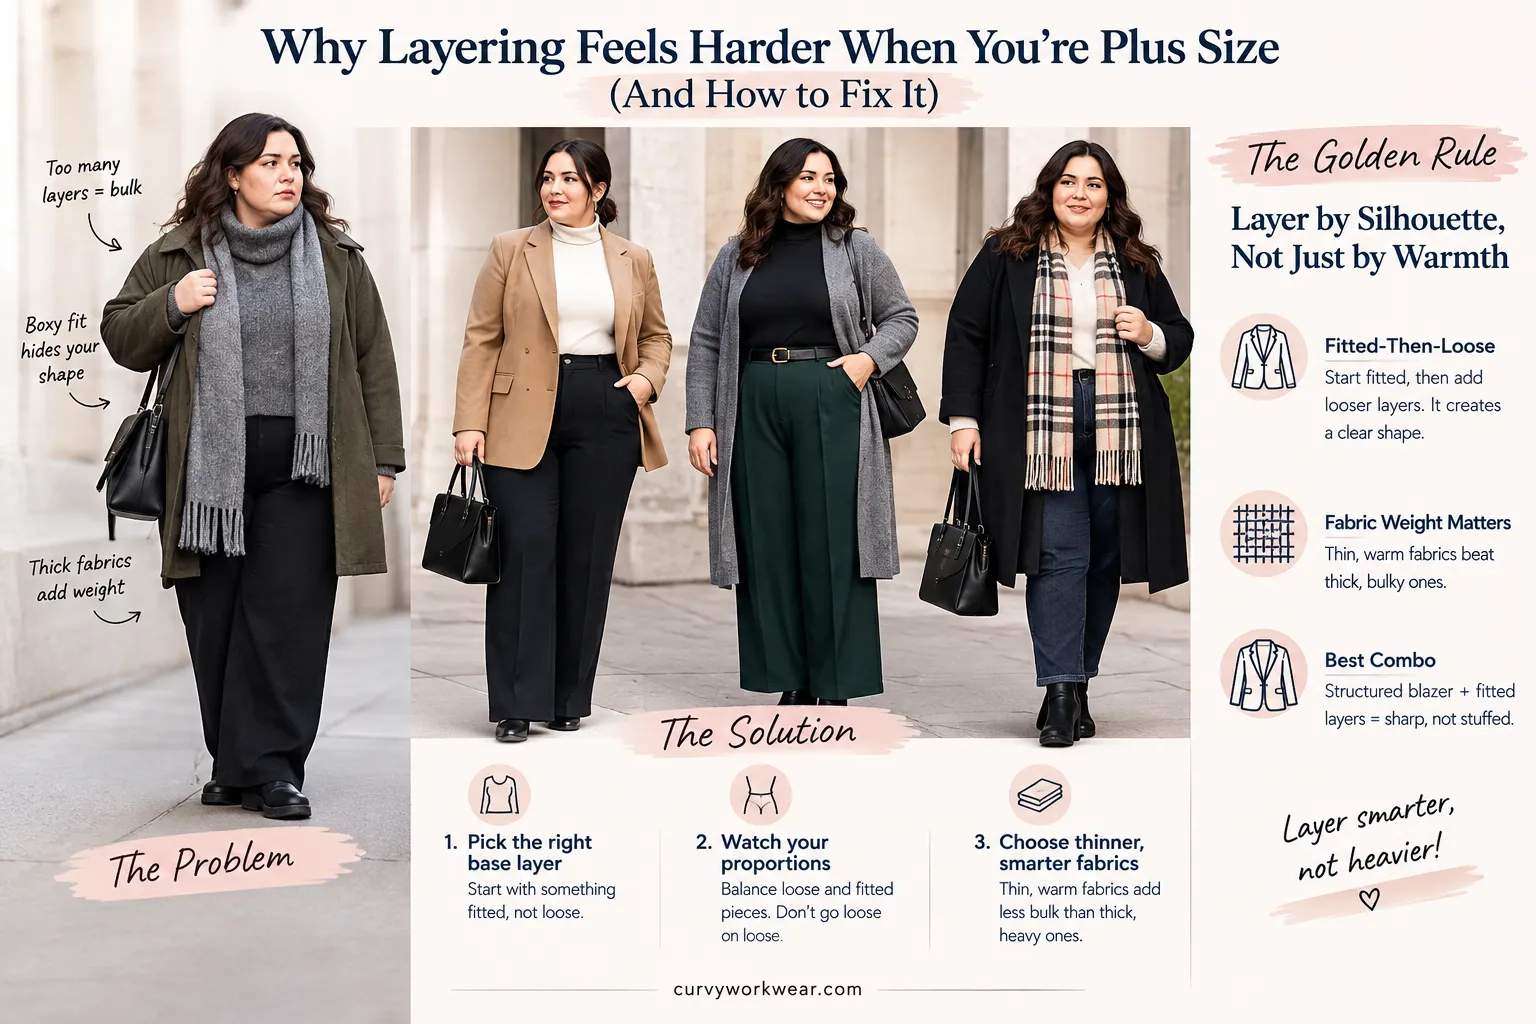
Every extra layer adds bulk. Add three layers, and you can end up looking bigger, not warmer.
There’s also the fit problem. Plus size outerwear often runs boxy. It’s cut wide to fit around the body, but it doesn’t always follow your shape. So even one extra coat can hide your waist completely.
Fabric choice makes this worse. Thick sweaters and heavy coats add visual weight fast. Two thick pieces together can look like one shapeless layer.
The good news? You don’t need fewer layers. You need smarter ones.
The fix comes down to three things:
Pick the right base layer. Start with something fitted, not loose. A fitted top gives your outer layers something to shape around.
Watch your proportions. Balance a loose top with fitted bottoms. Or pair a fitted top with a looser layer on top. Don’t go loose on loose.
Choose thinner, smarter fabrics. A thin merino sweater keeps you warmer than a thick cotton one. It also adds less bulk.
Once you get these three right, layering stops working against you. It starts working for you.
The Golden Rule: Layer by Silhouette, Not Just by Warmth
Most people layer for warmth only. They just keep adding pieces.
But shape matters just as much as warmth. How your layers sit together changes how you look. The goal isn’t just staying warm. It’s staying warm while keeping your shape visible.
That means thinking about fit, not just fabric count.
Why Fitted-Then-Loose Works Better Than Loose-on-Loose
Start with something fitted close to your body. Then add looser layers on top. This creates a clear shape underneath. Your loose layers have something to follow.
Two loose pieces together lose that shape. Everything blends into one big block. A fitted turtleneck under a loose cardigan works well. A loose shirt under a loose coat does not.
The rule is simple. Fitted first, loose after. Not loose after loose.
Fabric Weight Matters More Than Fabric Count
You don’t need more layers to stay warm. You need the right fabric. Thin, warm fabrics beat thick, bulky ones every time.
Merino wool is a good example. It’s thin but keeps heat in well. Thick cotton sweaters trap less heat but add more bulk. That’s the wrong trade.
Two thin layers often keep you warmer than one thick layer. They also look sleeker. Before adding another piece, check the fabric first. Thin and warm always wins over thick and heavy.
Combo 1 — The Structured Blazer Stack
A structured blazer is the easiest way to look put-together fast. It gives your outfit shape, even over simple basics. But bulk is the enemy here. Get the layers right, and it looks sharp, not stuffed.
What to Wear Underneath So It Doesn’t Bulk Up
Most layering advice is written for straight-size bodies. The tips don’t always translate. A loose cardigan over a loose shirt works differently on curves than it does on a smaller frame.
Skip thick sweaters under a structured blazer. The shoulders and lapels already add shape, so you don’t need extra padding underneath.
Go for thin, close-fitting layers instead. A fine-knit turtleneck works well in cooler weather. A simple cotton tee or fitted button-down works the rest of the year.
Tuck your base layer in. This keeps your waist clean and stops fabric from bunching under the jacket. If you’re layering two pieces, keep the second one thin too, like a lightweight vest or a slim cardigan.
Avoid anything with a bulky collar. Big collars fight with the blazer’s lapels and make your neckline look messy. Stick to crew necks, V-necks, or a plain collar that sits flat.
Watch your sleeve length too. Push shirt sleeves up slightly or choose a slim cut, so nothing pools under the blazer sleeves.
Best Fabric Picks for a Sharp Silhouette
The fabric of your blazer decides whether it holds its shape or looks limp by noon.
Wool blends are the safest choice. They hold structure well and don’t wrinkle easily. A wool-poly mix is even sturdier and travels better than pure wool.
Cotton twill is good for warmer days. It’s lighter than wool but still has enough body to keep its shape.
Avoid soft, floppy fabrics like jersey knit or thin linen for this look. They wrinkle fast and lose their crispness within an hour.
If you want some stretch for comfort, look for a small percentage of elastane blended in. This keeps the blazer sharp but lets you move freely.
For your under-layers, pick smooth, thin fabrics like fine cotton or merino wool. Thick or textured knits will show through the blazer and ruin the clean line.
Combo 2 — Turtleneck + Open Cardigan Formula
A turtleneck under an open cardigan is a classic cold-weather combo. It looks cozy but still neat. The trick is balancing the neck and getting the lengths right.
How to Avoid Neckline Overload
Two high necklines at once can look messy and stiff. Keep the focus on one strong neckline, not two competing ones. Choose a slim, close-fitting turtleneck. A bulky, folded-over collar adds too much height and weight near your face.
Let the cardigan stay open. Don’t add a scarf or a third layer around your neck. That’s one layer too many. If your cardigan has a collar or lapel, keep it simple. A shawl collar works better here than a busy, ribbed collar.
Pick a lighter turtleneck fabric if your cardigan is thick. Two heavy knits together will look bulky around your neck and chest. Keep jewelry minimal too.
A big necklace fights with the turtleneck and adds more clutter near your face.
Length Rules That Create an Instant Waistline
The right lengths shape your body. The wrong ones hide it completely.
Choose a turtleneck that hits right at your hip or slightly above. This keeps your torso looking long, not chopped in half. Let the cardigan run longer than the turtleneck. A cardigan that falls mid-thigh or lower creates a clean vertical line.
Tuck the turtleneck in, at least the front part. This defines your waist, even under an open cardigan. Avoid a cardigan that stops right at the hip. That length cuts your body at its widest point and looks boxy.
If you want to show your waist more, add a thin belt over the cardigan. Let it sit right at your natural waistline. Roll or push up your turtleneck sleeves slightly if the cardigan sleeves are looser.
This keeps the layers from looking sloppy at the wrists.
Combo 3 — Wrap Dress with a Tailored Coat
A wrap dress already shapes your body well. Add a tailored coat, and you get warmth without losing that shape. The belt and coat length make or break this combo.
Belting Techniques That Define Shape Without Squeezing
A wrap dress belt should shape your waist, not squeeze it. Tight belts dig in and look uncomfortable, not stylish. Tie the belt at your natural waist, the narrowest part of your torso. This is usually just above your belly button.
Leave a little breathing room. You should be able to fit two fingers under the belt comfortably. Skip a tight double knot. Instead, tie a simple knot or bow, then let the ends hang naturally at your side.
If the dress belt feels flimsy, swap it for a slightly wider fabric or leather belt. This holds its shape better all day. Smooth the fabric before you tie the belt. Pull the dress flat around your waist first, so nothing bunches under the knot.
Don’t over-tighten just to look slimmer. A belt that’s too tight creates fabric bulges above and below it.
Choosing a Coat Length That Flatters, Not Hides
The right coat length shows off the dress underneath. The wrong one hides your shape completely. Pick a coat that ends a few inches above or below the dress hem. This keeps the wrap dress visible and intentional.
Avoid a coat that stops right at the same length as the dress. That creates an awkward, chopped-off look. A knee-length coat works well with most wrap dresses. It shows some of the dress while still covering your legs.
If your dress is short, a longer coat can work too. Just make sure some dress peeks out at the bottom.
Keep the coat open, or belt it loosely, so the wrap dress waistline still shows through.
Choose a coat with some structure at the shoulders. This keeps your silhouette sharp, not swallowed by fabric.
Combo 4 — Monochrome Layering for a Slimming Effect
Wearing one color head to toe creates a long, unbroken line. That line makes you look taller and slimmer. But it takes a little skill to do it right.
Why Tonal Dressing Works Better Than Matching Colors Exactly
Matching every piece in the exact same shade can look flat and costume-like. Tonal dressing looks more natural and more expensive.
Tonal dressing means using different shades of the same color family. Think navy, slate blue, and soft powder blue together.
This slight contrast keeps your eye moving up and down your body. That movement is what creates the slimming, elongating effect.
Exact color matching, on the other hand, can look stiff. It draws attention to the “matchy” outfit instead of your shape. Mixing shades also hides small fit issues better.
A slightly different tone breaks up the outfit, so seams and lines blend in. Pick one dominant shade first, like charcoal or camel. Then build the rest of the outfit in shades lighter or darker than that.
Keep your color family tight. Stick to three shades of the same color, so the look still feels put-together, not random.
Adding Texture So Monochrome Doesn’t Look Flat
One color across your whole outfit can look boring without some texture. Texture adds depth, even when the color stays the same. Mix fabrics with different surfaces.
Try a smooth blouse, a ribbed knit, and a slightly nubby wool coat together. Knits are an easy way to add texture. A cable knit sweater or waffle-knit top breaks up plain, flat fabrics.
Add one shiny or slightly reflective piece if you want extra dimension. A satin skirt or sleek leather boot works well. Layer different weights too.
Pair a lightweight top with a heavier coat or blazer in the same color family. Accessories help too. A woven bag or textured scarf adds interest without breaking your color scheme.
Avoid using only matte, flat fabrics throughout. That combination can flatten your whole silhouette instead of shaping it.
Combo 5 — Vest-Over-Shirt Office Layering
A vest over a shirt is a smart, easy office look. It adds polish without much effort. Getting the proportions right makes all the difference.
Proportion Tricks for Vests on Curvier Frames
Vests can either flatter curves or hide them completely. The fit around your bust and waist matters most. Choose a vest with a slight waist shape, not a straight boxy cut. This follows your curves instead of hiding them.
Avoid vests that are too tight across the chest. Tight buttons pull and create gaps, which looks messy, not sleek. Go one size up if the vest pulls at the button line.
A little extra room drapes better than a too-tight fit. Pick a vest that ends at or slightly below your natural waist. This length flatters curvier frames better than a cropped one.
V-neck vests work well too. They create a longer neckline and draw the eye down in a flattering way. Avoid double-breasted vests if you’re fuller through the middle. Single-breasted styles sit flatter and look less bulky.
Pairing Bottoms That Balance the Top Layer
The right bottoms balance out the vest and shirt combo. The wrong ones make the outfit look top-heavy. Pair a fitted vest with wide-leg or straight-leg trousers.
This balances a structured top with some movement below. Avoid skinny pants if your vest is boxy or cropped. That combination can make your upper body look larger.
Tuck your shirt in fully. This keeps the waistline clean under the vest and stops fabric from bunching up. A high-waisted skirt works well too. It lines up with the vest’s waistline and creates one long, balanced shape.
Keep your bottoms simple if the vest has any pattern. Plain trousers or a solid skirt let the top layer stand out.
Match your shoes to the mood of the bottoms. Loafers or low heels finish this look best for the office.
Small Details That Make Big Layering Look Intentional
Big layering looks work because of small details. Sleeves and tucking are two of the easiest to get wrong. Get them right, and everything looks planned, not thrown together.
Sleeve Length Coordination Between Layers
Mismatched sleeves are one of the biggest signs of bad layering. Getting them to line up makes a huge difference. Each layer should peek out slightly from the one before it.
A shirt cuff should show just past your sweater sleeve. Aim for about half an inch of peek-out. Any more looks messy, any less looks like a mistake.
If your outer layer has shorter sleeves, roll up the layer underneath. This avoids bunched fabric poking out awkwardly. Match sleeve bulk too.
A thick sweater under a slim-fit jacket will bunch up and strain the seams. Push blazer or coat sleeves up slightly if they’re too long. This shows a bit of wrist and looks more relaxed.
Keep sleeve lengths in mind when you buy separates. Pieces from the same size range usually layer better together.
Where to Tuck (and Where Never To)
Tucking shapes your outfit. But tucking the wrong piece can throw off the whole look. Always tuck your base layer, like a shirt or thin top. This keeps your waistline clean under jackets and cardigans.
Never tuck a bulky sweater into pants or a skirt. It adds bulk right at your waist and looks lumpy. Use a half-tuck for a more relaxed look. Tuck just the front section in, and leave the sides loose.
Don’t tuck your outer layer, like a blazer, cardigan, or coat. These pieces are meant to hang loose over everything else. If a top has a curved or dropped hem, skip tucking it fully. Let the shape show instead of forcing it into pants.
Tuck thin layers only. Thick or stiff fabric won’t tuck smoothly and will create odd lumps at your waist.
Fabrics to Avoid When You’re Layering Multiple Pieces
Some fabrics just don’t layer well. They add bulk, cling, or slide around in annoying ways. Thick fleece, chunky cable knits, and heavy corduroy all add too much width.
They strain the seams of any jacket or blazer worn on top. Stiff denim and rough, textured fabrics like tweed don’t work as base layers either.
They don’t move well under other clothes and feel stiff to wear. Silky fabrics like silk or satin cause a different problem. They slide around and bunch up under other layers instead of sitting flat.
Stretchy spandex blends and puffy quilted fabric also cause trouble as inner or middle layers. Spandex clings to everything underneath it, and quilted fabric is too bulky unless it’s your outer layer.
For the smoothest results, stick to thin, simple fabrics like cotton, fine wool, and light jersey as your base.
How to Layer Without Overheating Indoors
Layering for cold weather is smart, but overheating indoors is a real problem. The trick is picking layers you can remove easily. Plan your outfit so each piece works on its own too.
Choose thin layers over one thick one. A few light pieces trap warmth better and let you peel off layers as needed. Bulky sweaters are harder to manage once you’re inside a warm office or store.
Pick breathable fabrics like cotton or fine wool for your base layer. These let heat escape instead of trapping it against your skin. Avoid synthetic fabrics close to your body, since they trap heat and can feel sweaty fast.
Skip turtlenecks under heavy coats if you’re heading somewhere warm. Choose a lower neckline instead, so you have room to cool down. Layer a scarf loosely too, so it’s easy to remove without messing up your hair or collar.
Carry a tote bag or work bag with room for extra layers. This gives you somewhere to stash a scarf, cardigan, or coat once indoors. Planning ahead means you stay comfortable all day, no matter the temperature changes.
Quick Layering Checklist Before You Leave the House
Run through this quick checklist before you walk out the door. It only takes a minute, but it catches most layering mistakes.
- Grab a bag with room for extra layers, just in case.
- Check your base layer is thin and smooth, not bulky.
- Make sure sleeves peek out evenly between each layer.
- Tuck only your base layer, never your outer layer.
- Confirm your belt sits at your natural waist, not too tight.
- Look at your neckline. Avoid stacking two high necklines together.
- Check your coat or blazer length against your dress or skirt.
- Make sure your outer layer can come off without ruining the outfit.
- Look in a mirror from the side, not just the front.
- Pick one statement piece, and keep the rest simple.
Final Thoughts
Layering looks hard, but it really comes down to a few simple rules. Pick thin base layers, watch your proportions, and let one piece stand out. The rest falls into place naturally once you get those basics right.
Don’t overthink every outfit from scratch. Once you find a combo that works for your body, repeat it with small changes. Swap colors, textures, or accessories, and you’ll always look put-together without much effort.
Start with one or two combos from this list and practice them first. Getting comfortable with sleeve lengths, tucking, and belting takes a little trial and error. But once it clicks, layering becomes second nature, not a daily struggle.
Disclaimer:
This article shares general styling tips based on common fashion principles. Every body is different, so use these ideas as a starting point, not a strict rule. Fit, comfort, and personal style always matter more than any guideline. Try different combos and trust what actually feels right and looks good on you.