Got a hole in your favorite jeans? Don’t throw them out just yet — learning how to patch jeans is easier than most people think, even with zero sewing experience.
Whether it’s a torn knee, a worn-out thigh, or a small rip near the pocket, a patch can bring your jeans back to life. In this guide, you’ll learn exactly how to patch jeans at home, step by step, using tools you probably already have.
Why Patch Your Jeans Instead of Tossing Them?
Jeans are built to last, but they still wear out in the same spots over time. The knees, thighs, and back pockets take the most stress from daily movement.
Patching is faster and cheaper than buying a new pair. It also keeps good denim out of the landfill, which is a real concern; the U.S. Environmental Protection Agency reports that discarded clothing is the main source of textile waste in municipal trash, with millions of tons landfilled every year.
Moreover, a patch can add character to your jeans. Many brands now sell “pre-ripped” jeans for a high price, so a visible patch can actually look intentional and stylish. If you’re curious about other denim silhouettes worth trying once your jeans are repaired, our guide on baggy jeans fit and style is a good next read.
What You’ll Need to Patch Jeans and Repair Denim
Before you start, gather your supplies. You don’t need anything fancy for basic denim repair.
Basic Supplies
- A patch of denim fabric (you can cut this from an old pair of jeans)
- Fabric scissors
- Needle and strong thread, or a sewing machine
- Straight pins or fabric clips
- Iron and ironing board (if using iron-on patches)
Optional Tools
- Iron-on adhesive patch or fusible interfacing
- Fabric glue (for a no-sew option)
- Embroidery thread, if you want a decorative stitch pattern
Any of these tools work fine. The right choice depends on how much time you have and whether you want the patch to be hidden or visible.
How to Patch Jeans: Step-by-Step Guide
Here’s the full process, broken down into simple steps anyone can follow.
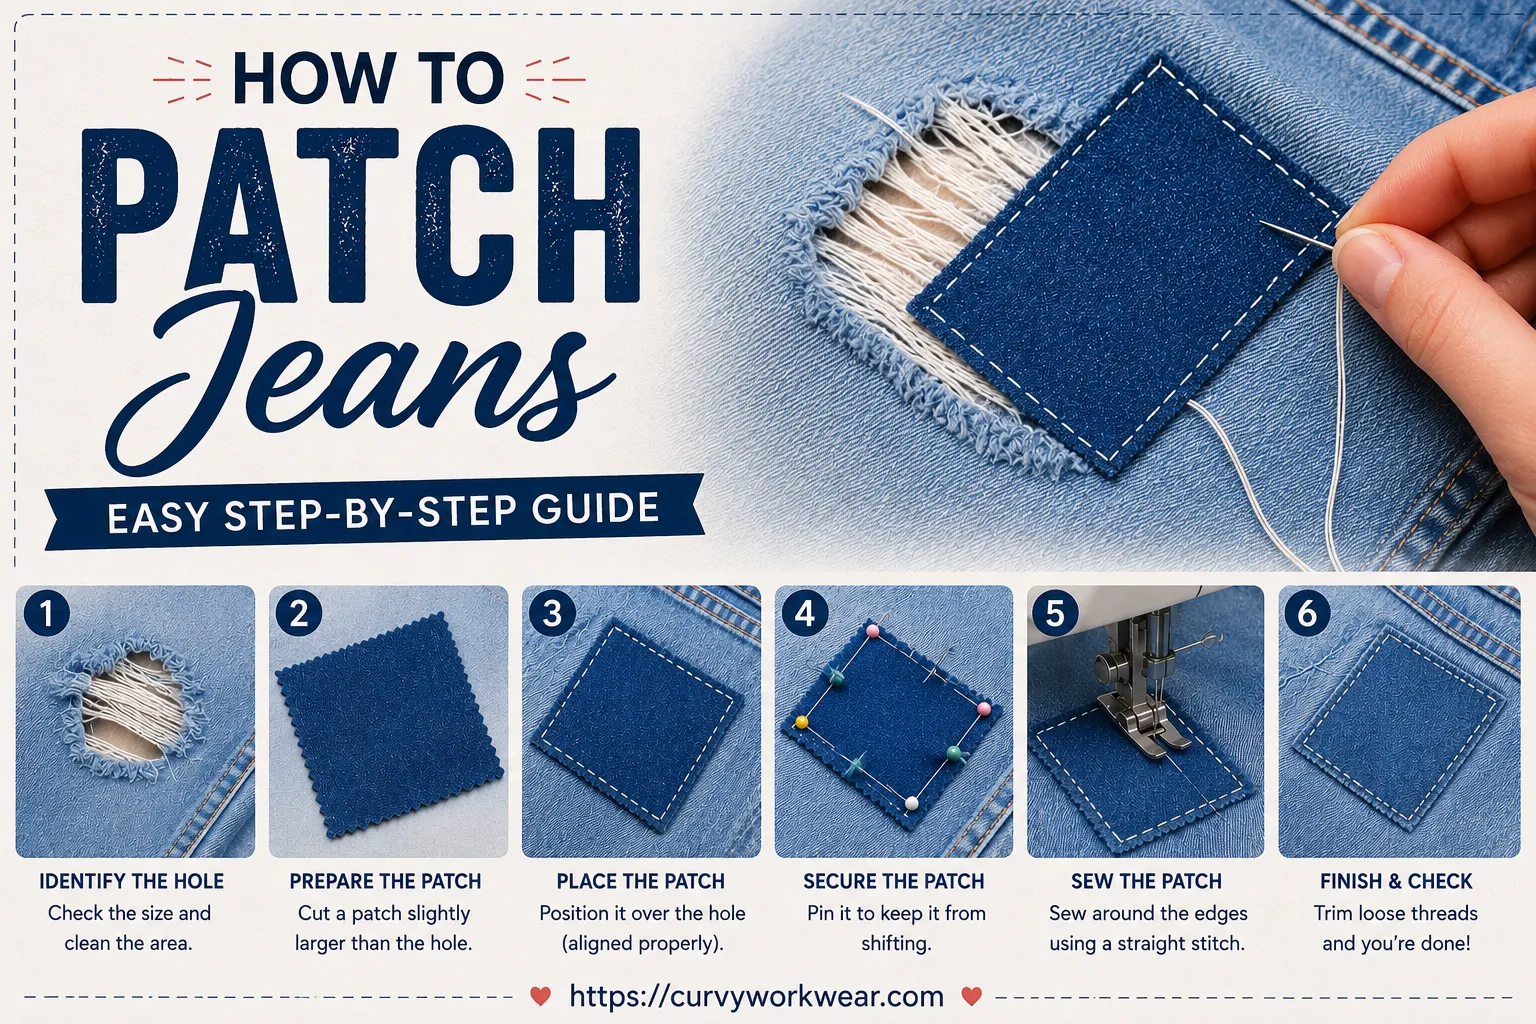
Step 1: Clean and Prep the Jeans
Wash and dry your jeans before you start. This removes dirt and lint from the torn area, so the patch sticks or sews on smoothly.
Once dry, lay the jeans flat on a table. Trim any loose threads around the hole with scissors.
Step 2: Cut Your Patch
Cut a piece of denim slightly bigger than the hole, leaving at least one inch of extra fabric on each side. This extra space gives the patch something solid to hold onto.
For a nearly invisible repair, match the patch color and texture to your jeans. For a visible, decorative look, try a contrasting fabric or color instead.
Step 3: Place the Patch
If you’re patching from the inside, slide the patch fabric under the hole so it sits behind the torn area. This is the most common method because it hides raw edges.
If you prefer a visible patch, place it on top of the hole instead. Both methods work; it’s really a matter of personal style.
Step 4: Pin or Iron the Patch in Place
Use straight pins or fabric clips to hold the patch steady before sewing. It helps keep everything securely in place while you work.
If you’re using an iron-on patch, follow the product instructions. Usually, you’ll place the patch, cover it with a cloth, and press with a hot iron for about 10 to 15 seconds.
Step 5: Sew the Patch
Thread your needle and knot the end. Sew around the edges of the patch using small, even stitches.
A simple straight stitch or whip stitch works well for beginners. If you have a sewing machine, a zigzag stitch adds extra strength and prevents fraying.
Step 6: Reinforce the Edges
Go over the edges of the torn fabric with a few extra stitches. This step, called reinforcing, stops the hole from getting bigger again.
For high-stress areas like the knee, sew back and forth a couple of times for added durability.
Step 7: Trim and Finish
Once the patch is secure, trim any loose threads. Turn the jeans right-side out and check your work in good lighting.
If you used an iron-on patch, let the jeans cool completely before wearing them.
Advantages and Disadvantages of Patching Jeans
Before you commit to a repair, it helps to know what patching does well and where it falls short.
Advantages
- Costs far less than replacing the jeans
- Saves a pair you already love and that already fits well
- Can be done at home with basic supplies
- Reduces textile waste, since fewer jeans end up in the trash
- Lets you customize the look with visible mending or embroidery
Disadvantages
- Hand-sewn patches take time and patience to get neat
- A poorly placed patch can look messy or feel stiff against the skin
- Iron-on patches may loosen with heavy washing
- Very large tears or damage near seams can be harder to fix well
- Repeated patching on the same spot can eventually weaken the fabric further
Different Ways to Repair Jeans
There’s more than one way to fix denim, depending on your skill level and the type of damage. Sewing brand Bernina’s WeAllSew blog notes that the right method often comes down to whether you want the repair to disappear or stand out as part of the jeans’ story.
Sew-On Patches
This is the most durable method. Hand-sewing or machine-sewing a patch holds up well through washing and daily wear.
Iron-On Patches
Iron-on patches are the fastest option. They’re great for small holes but may loosen over time with heavy washing, so occasional touch-up stitching helps.
Visible Mending and Embroidery
Visible mending uses colorful thread or patterns, like the Japanese sashiko technique described by Taylor Stitch’s mending guide, to turn a repair into a design feature. It’s a popular option for people who want their jeans to look unique instead of “fixed.”
No-Sew Fabric Glue
Fabric glue works for quick, temporary fixes. However, it’s not as long-lasting as sewing, especially in high-movement areas like the knees.
How to Patch Jeans at Home Without a Sewing Machine
You don’t need a sewing machine to repair jeans. Hand-sewing takes a little longer, but it works just as well for small to medium holes.
For beginners, start with an iron-on patch combined with a few hand stitches around the edges. This gives you the ease of ironing with the extra strength of sewing.
If you’re nervous about visible stitches, practice on an old piece of fabric first. It only takes a few tries to get comfortable with the needle.
Tips for a Long-Lasting Jeans Patch
A few small habits can make your repair last much longer.
- Wash patched jeans inside out to protect the stitching.
- Avoid high heat when drying, since it can weaken thread and glue.
- Check patches every few washes and re-stitch loose edges early.
- Use denim-weight fabric for patches, not thin cotton, since it holds up better under stress.
These tips apply whether you’re fixing one small hole or restoring an entire pair of old jeans. For more denim styling ideas once your jeans are repaired, browse our jeans fashion section.
FAQ: How to Patch Jeans
What is the easiest way to patch jeans for beginners?
An iron-on patch is the easiest method for beginners. It requires no sewing skills, just a hot iron and a few minutes of pressing.
Can I patch jeans without buying a patch kit?
Yes. You can cut a patch from an old pair of jeans or any sturdy denim fabric you already have at home.
How do I patch jeans so it doesn’t show?
Place the patch on the inside of the jeans and use thread that matches the fabric color. Stitching close to the original seam lines also helps it blend in.
Do iron-on patches really last on jeans?
Iron-on patches can last a while, but they tend to loosen with frequent washing. Adding a few hand stitches around the edges helps them stay in place longer.
What’s the best fabric to use to patch jeans?
Denim fabric works best because it matches the weight and stretch of your jeans. You can cut it from an old, unused pair for a perfect match.
Conclusion
Learning how to patch jeans is a simple skill that saves money and keeps your favorite denim in your closet longer. Whether you choose to sew, iron on, or even turn the repair into a fun design, the process is easier than most people expect, and weighing the advantages and disadvantages above can help you pick the right method for your jeans.
Grab a needle, an old scrap of denim, and give it a try on your next torn pair. Once you see how simple it is, you’ll never toss a good pair of jeans over a small hole again.
Disclaimer: This guide is for general information only. It covers basic denim repair techniques for personal, everyday jeans. Always test a new method on an old or hidden area of fabric first, and use caution with needles, scissors, and hot irons.