Ever wished you could wake up with curled, darker lashes without touching a mascara wand? That’s exactly what a lash lift and tint does.
If you’re tired of daily curling routines or clumpy mascara, this treatment might be the answer. A lash lift and tint is a semi-permanent beauty service that curls your natural lashes and darkens them at the same time. It saves time, looks natural, and lasts for weeks.
In this guide, we’ll cover what the treatment involves, its real benefits and drawbacks, the full process, how much it costs, who should (and shouldn’t) get one, and how to care for your lashes afterward. By the end, you’ll know exactly what to expect before booking your first appointment.
What Is a Lash Lift and Tint?
A lash lift and tint is a two-part beauty treatment for your natural eyelashes. It’s not the same as lash extensions, which add fake lashes to your real ones.
Instead, this treatment works with the lashes you already have. A lash lift curls your lashes upward from the root, giving them a natural, wide-awake look. A tint adds color, usually a deep black or brown, to make your lashes look fuller and more defined.
Think of a lash lift like a perm for your eyelashes. Just like a hair perm reshapes hair using a curling rod and solution, a lash lift reshapes lashes using a small silicone shield and a setting solution. In fact, “lash lift” and “eyelash perm” describe the same core process — lash lift is simply the more modern name, usually paired with tinting.
During the appointment, the lift always happens first, then the tint goes on last. Tinting before lifting would waste most of the color, since the lifting and setting solutions used afterward can strip it away.
How It’s Different From Lash Extensions
Lash extensions attach individual synthetic fibers to each natural lash. They add length and volume, but they need regular fills every two to three weeks.
A lash lift and tint, on the other hand, only enhances what you naturally have. There’s no added length or synthetic material, which is what makes it a lower-maintenance, generally lower-cost option for people who want a natural look. If you’re weighing the two side by side, our powder brows guide covers a similar low-maintenance-versus-natural trade-off for brows, which can help you think through the same decision for lashes.
Advantages and Disadvantages of a Lash Lift and Tint
A lash lift and tint enhances your natural lashes without extensions. However, the results and possible risks depend on your lash condition, skin sensitivity, and the technician’s skill.
| Advantages | Disadvantages |
|---|---|
| Saves daily styling time: Lashes look lifted and darker without a daily eyelash curler or mascara. | Possible irritation: Lifting solutions and tint products may cause eye irritation or allergic reactions. |
| Natural-looking results: Enhances your existing lashes without adding artificial fibers. | No added length or volume: It cannot make naturally sparse or short lashes fuller or longer. |
| Long-lasting results: Effects commonly last around 6–8 weeks, depending on your lash growth cycle and aftercare. | Risk of lash damage: Overprocessing or frequent treatments can leave lashes dry, brittle, or weakened. |
| Low maintenance: No extension fills are needed as your natural lashes grow and shed. | Results cannot be quickly reversed: An uneven or overly curled lift may need time to grow out. |
| Convenient for active lifestyles: Once aftercare restrictions have passed, lifted lashes can be easier to manage during everyday activities. | Results vary: Naturally short, sparse, or uneven lashes may produce less noticeable results. |
| No lash extensions required: The treatment works with your natural lashes rather than attaching artificial fibers. | Not suitable for everyone: People with eye infections, irritated eyelids, or a history of reactions to tint products may need to avoid treatment. |
Important safety tip: Choose a trained lash technician who follows product instructions and uses products specifically intended for the eye area. Ask about allergy precautions and patch testing before treatment, especially if you have sensitive skin or previous reactions. A patch test can reduce some risks but cannot guarantee that an allergic reaction will not occur.
Benefits of a Lash Lift and Tint
The lash lift and tint benefits go beyond just looking good. Here’s why so many people choose this treatment over daily lash routines.
Saves Time Every Morning
You skip the mascara and eyelash curler entirely. Your lashes already look curled and dark the moment you wake up, which can shave several minutes off your morning routine.
Looks Natural
Since the treatment uses your own lashes, the result blends in naturally. There’s no risk of a fake or overdone look.
Long-Lasting Results
A lash lift and tint typically lasts six to eight weeks, depending on your natural lash growth cycle. This is much longer than a coat of mascara, which wipes off at the end of the day.
Low Maintenance
Unlike extensions, you don’t need fill appointments. Once it’s done, you simply let your lashes grow out naturally.
Works Around Water and Sweat
After the initial 24 to 48 hour setting window, a lash lift and tint holds up well against swimming, sweating, and humidity. This makes it a popular pick before vacations, weddings, or photoshoots.
Gentler for Sensitive Eyes
Since there’s no glue involved like with extensions, a lash lift and tint can be a gentler option for people who react to lash glue, and it’s generally fine for contact lens wearers too. However, always mention any allergies or sensitivities to your technician beforehand.
The Lash Lift and Tint Process, Step by Step
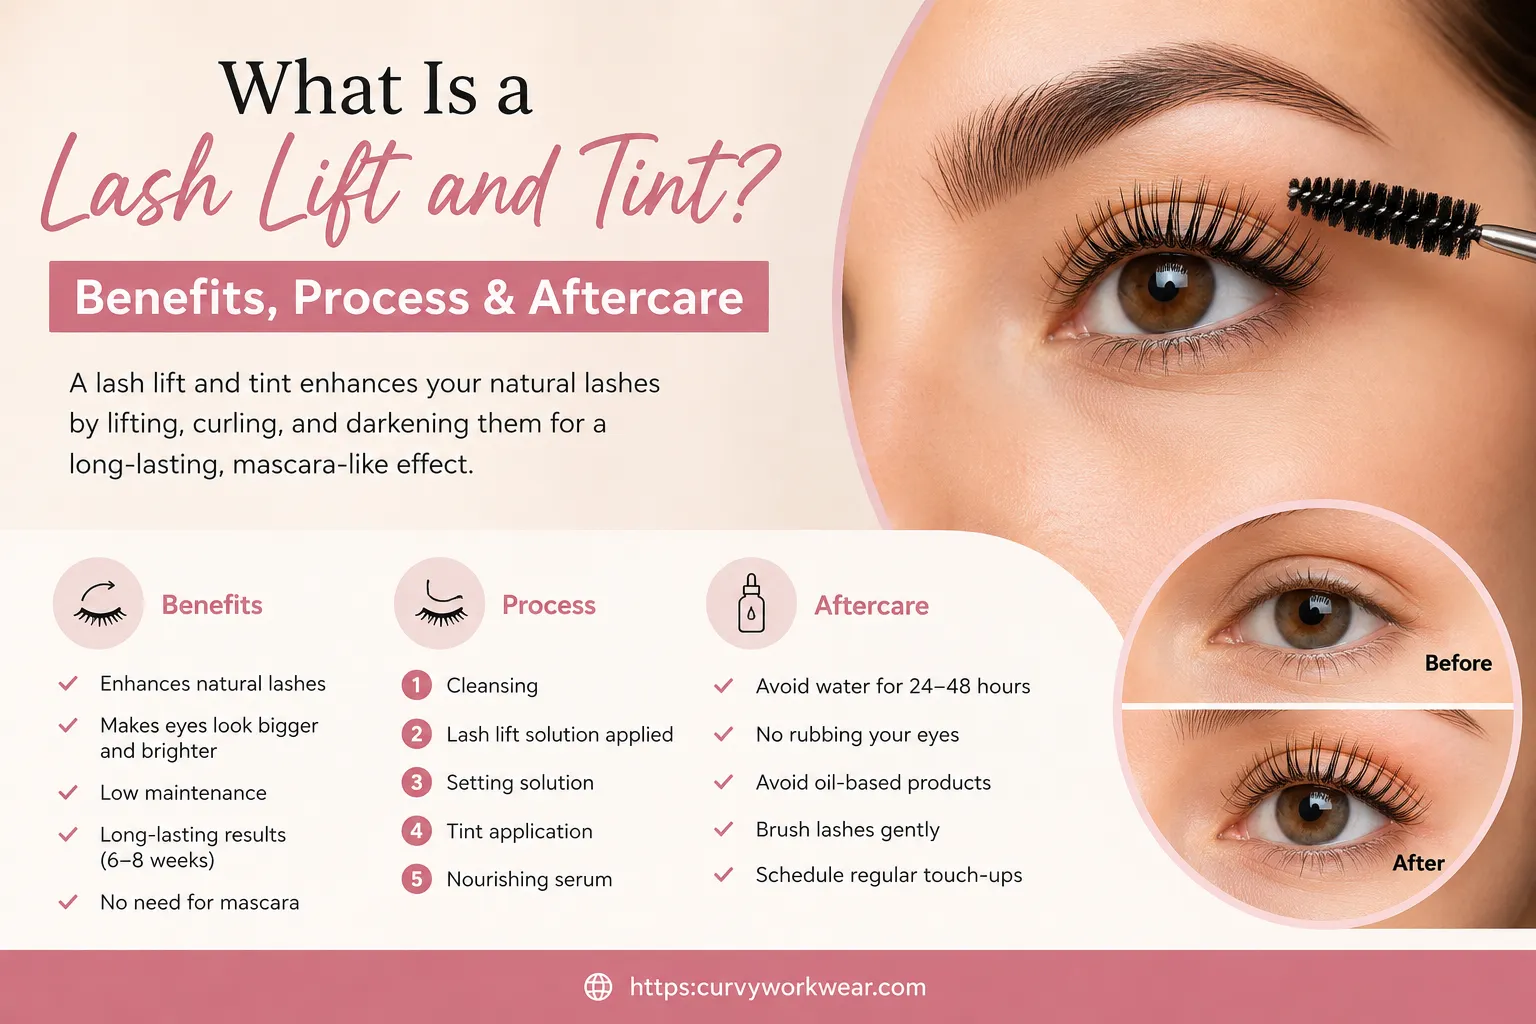
Knowing what happens during the appointment can help you feel more relaxed. Most sessions take about 45 minutes to an hour, and you’ll lie back with your eyes closed the entire time. It shouldn’t hurt at all — some people even doze off.
Step 1: Cleansing
The technician starts by cleaning your natural lashes thoroughly. This removes oil, makeup, and dirt so the lifting solution can work properly.
Step 2: Applying the Silicone Shield
A small silicone shield, sized to fit your eye shape and the curl intensity you want, is placed on your eyelid. Your lashes are then combed straight and lifted up onto this shield.
Step 3: Applying the Lifting Solution
A lifting solution is brushed onto the lashes. This softens the internal bonds in the lash hair so it can be reshaped around the curved shield. It generally stays on for about 8 to 12 minutes, depending on how coarse your lashes are.
Step 4: Setting the Curl
A setting (or neutralizing) solution is applied next. This locks the new curled shape into place, similar to how a perm setting solution works on hair.
Step 5: Tinting
Once the lift is set, the technician applies a tint. This darkens the lashes, especially helpful for people with naturally light or blonde lashes, and usually processes for 5 to 10 minutes.
Step 6: Removing the Solutions
The technician removes the silicone shield and cleans off any remaining product, often finishing with a nourishing lash serum or oil. Your lashes are now curled and tinted, ready to show off.
Lash Lift and Tint Before and After: What Changes to Expect
Looking at lash lift and tint before and after results, the difference is usually noticeable but natural. Straight or downward-pointing lashes curl upward, and pale or light-colored lashes turn a rich black or brown.
However, results vary based on your natural lash length and thickness. Someone with short lashes will see a lift, but won’t gain extra length, since this treatment doesn’t add anything artificial.
Does It Work on Short, Thin, or Blonde Lashes?
Yes, but the effect looks a little different depending on your starting point. Short lashes still get lifted and look more open, they just won’t suddenly look long. Thin or sparse lashes look neater and better defined after a lift, though the treatment can’t add density that isn’t there. Blonde or very light lashes often see the biggest visible change of all, since the tint alone can look like a coat of mascara.
It’s also worth noting that first-time results can differ slightly from what you see in before and after photos online. Everyone’s lash type reacts differently to the lifting solution. Your technician can give you a realistic idea based on your lash type during a consultation.
How Much Does a Lash Lift and Tint Cost?
Pricing for a lash lift and tint varies quite a bit depending on your location, the salon, and the technician’s experience level. As a general guide, expect to pay somewhere in the range of moderate, mid-tier beauty service pricing — generally more than a basic brow wax but less than a full set of lash extensions.
A few cost factors to keep in mind:
- Salon location: Studios in major cities or upscale neighborhoods usually charge more than suburban or small-town salons.
- Bundled vs. separate services: Booking the lift and tint together is typically more cost-effective than paying for each separately.
- Technician experience: More experienced lash artists often charge a premium, but they’re also less likely to cause uneven results.
Since exact prices change often and vary widely by region, it’s best to check current pricing directly with a few local salons rather than relying on a fixed number.
Lash Lift and Tint vs. Lash Extensions
Both treatments enhance your lashes, but they work in very different ways. Here’s a simple side-by-side comparison to help you decide.
| Factor | Lash Lift and Tint | Lash Extensions |
|---|---|---|
| How it works | Curls and darkens your own lashes | Glues synthetic fibers onto natural lashes |
| Appointment length | About 45–60 minutes | 90+ minutes for a first full set |
| How long it lasts | 6–8 weeks, no fills needed | 2–3 weeks between fill appointments |
| Maintenance | Low | Higher — regular brushing and fills |
| Look | Natural, enhanced version of your own lashes | Customizable, from natural to dramatic |
| Best for | Low-maintenance, natural results | Extra length, volume, or drama |
Should You DIY It or Go to a Professional?
At-home lash lift kits do exist, and they’re generally cheaper per use than a salon visit. However, doing it yourself comes with real risks: you have to work on one eye at a time, it’s harder to avoid getting solution in your eye, and misapplied products can cause uneven curls or skin irritation.
If you’re new to lash lifts, a professional appointment is the safer starting point. Once you know how your lashes react and how long your curl lasts, you can decide if a DIY kit fits your comfort level and budget.
Preparing for Your Appointment
A little prep goes a long way toward a smooth appointment and better results.
- Arrive with clean lashes — no mascara, eyeliner, or eye cream.
- Skip oils or heavy moisturizers around your eyes that day.
- Mention any allergies, recent eye treatments, or medical conditions during your consultation.
- Ask your technician about curl strength and tint shade options before they start.
Lash Lift and Tint Aftercare: How to Make It Last
Good lash lift and tint aftercare directly affects how long your results last. The first 24 to 48 hours matter the most.
Avoid Water and Steam
Keep your lashes completely dry for at least 24 hours after treatment, and avoid steam for up to 48 hours. This means no showers with steam, no swimming, and no crying (as hard as that may be to control).
Skip Eye Makeup Briefly
Avoid mascara and eye makeup for at least a day after your appointment. This gives the lashes time to fully set in their new curl.
Don’t Rub or Pick at Your Lashes
Rubbing your eyes can loosen the curl pattern early. Be gentle when washing your face, and pat the eye area instead of scrubbing it.
Sleep on Your Back If Possible
Sleeping face-down can flatten the curl over time. If you’re a side or stomach sleeper, a silk or satin pillowcase creates less friction and helps protect the curl.
Use a Lash Serum
Some technicians recommend a nourishing lash serum or oil, applied to the tips rather than the base, to keep lashes healthy between appointments. Ask your technician for a product recommendation suited to your lash type.
Avoid Oil-Based Makeup Removers
Oil-based products can loosen the tint and curl faster. Water-based or gentle micellar removers are usually a safer choice. If you do wear mascara after the first 24 hours, choose a water-based formula you can rinse off easily rather than a waterproof one.
Brush Daily
A quick pass with a clean spoolie brush each morning keeps lashes separated and helps the curl look its best between salon visits.
FAQs About Lash Lift and Tint
Is a Lash Lift Damaging to Eyelashes?
A lash lift is generally safe when performed correctly, but overprocessing or frequent treatments can leave lashes dry, brittle, or damaged. Choose a trained technician and follow aftercare instructions.
How Long Do Lash Lift and Tint Last?
A lash lift and tint typically lasts 6–8 weeks. Results gradually fade as your natural lashes grow and shed. Tint may fade sooner, depending on the product and aftercare.
What Is Better, a Lash Lift or Lash Tint?
A lash lift curls and lifts your natural lashes, while a lash tint darkens them. Choose a lift for more curl, a tint for darker lashes, or both for a more defined look without extensions.
Conclusion
A lash lift and tint is a simple way to get curled, darker lashes without extensions or daily mascara. It works with your natural lashes, lasts several weeks, and needs very little upkeep once it’s done, though it’s still a chemical treatment applied close to the eyes, so it isn’t completely without risk.
From the process to the cost to aftercare, knowing what to expect helps you get the best results and keep them looking fresh longer. If you’re considering it, look for a licensed lash technician, ask about their experience, and don’t skip the aftercare tips above.
Ready to try it for yourself? Book a consultation with a trusted lash studio near you and ask them to walk you through what results you can realistically expect for your lash type.
Disclaimer: This article is for general informational purposes only and does not constitute medical or professional cosmetic advice. A lash lift and tint involves chemical solutions used near the eyes, and individual reactions can vary. Always consult a licensed, experienced lash technician before your appointment, and speak with a doctor or ophthalmologist if you have an existing eye condition, known allergies, or are pregnant or breastfeeding. If you experience irritation, redness, or swelling after treatment, stop use and seek medical advice.