A button pops off right before you walk out the door. It happens to everyone, and it’s never at a good time. The good news is you don’t need a sewing machine or years of practice to fix it. Once you know how to sew a button, the whole job takes about five minutes. This guide walks you through every step, from picking the right thread to tying off the final knot. By the end, you’ll be able to fix a loose button anywhere, anytime.
Disclaimer: This guide is for general informational purposes only. Sewing techniques can vary slightly by fabric type, button style, and garment construction. For delicate, tailored, or expensive garments, consider checking the care label or asking a professional tailor before making repairs at home.
Advantages and Disadvantages of Sewing a Button by Hand
Before you grab a needle, it helps to know what hand-sewing a button actually involves, and how it compares to other fixes like a sewing machine or a tailor.
Advantages of Sewing a Button by Hand
- Fast and cheap: Once you know how to sew a button, the whole fix costs almost nothing and takes just minutes.
- No equipment needed: You only need a needle, thread, and scissors, no machine or special skills required.
- Portable skill: You can sew a button anywhere, at home, at work, or while traveling.
- Stronger control: Hand-sewing lets you control tension and shank length better than a machine can on a single button.
Disadvantages of Sewing a Button by Hand
- Takes practice for speed: Beginners may take longer than five minutes on their first few tries.
- Less consistent than machine stitching: Hand stitches can look slightly uneven compared to factory or machine work.
- Not ideal for bulk repairs: If you have many buttons to replace, a sewing machine with a button-stitch setting is faster.
- Requires good lighting and eyesight: Small buttonholes can be hard to see in dim light or without reading glasses.
Weighing these points helps you decide whether a quick hand fix is enough, or whether the garment needs a machine repair or a tailor’s help instead.
What You’ll Need Before You Sew a Button
You don’t need a full sewing kit to reattach a button. A few basic tools are enough to get the job done.
Basic Supplies
- A needle (a regular sewing needle works fine)
- Thread that matches or is close to your fabric color
- The button itself
- Small scissors or nail clippers to cut thread
- A pin (optional, but helpful for spacing)
Where to Find These Items
Most homes already have a small sewing kit tucked in a drawer. If not, these supplies are cheap and available at any craft store, pharmacy, or supermarket. Many hotels also offer small sewing kits for free. So if a button pops while you’re traveling, check your room first.
How to Sew a Button Step by Step
Here’s the full process broken into simple steps. Follow them in order, and you’ll have your button back on in minutes. This is the same basic method outlined by outdoor brand Patagonia in its own garment repair guide.
Step 1: Thread the Needle
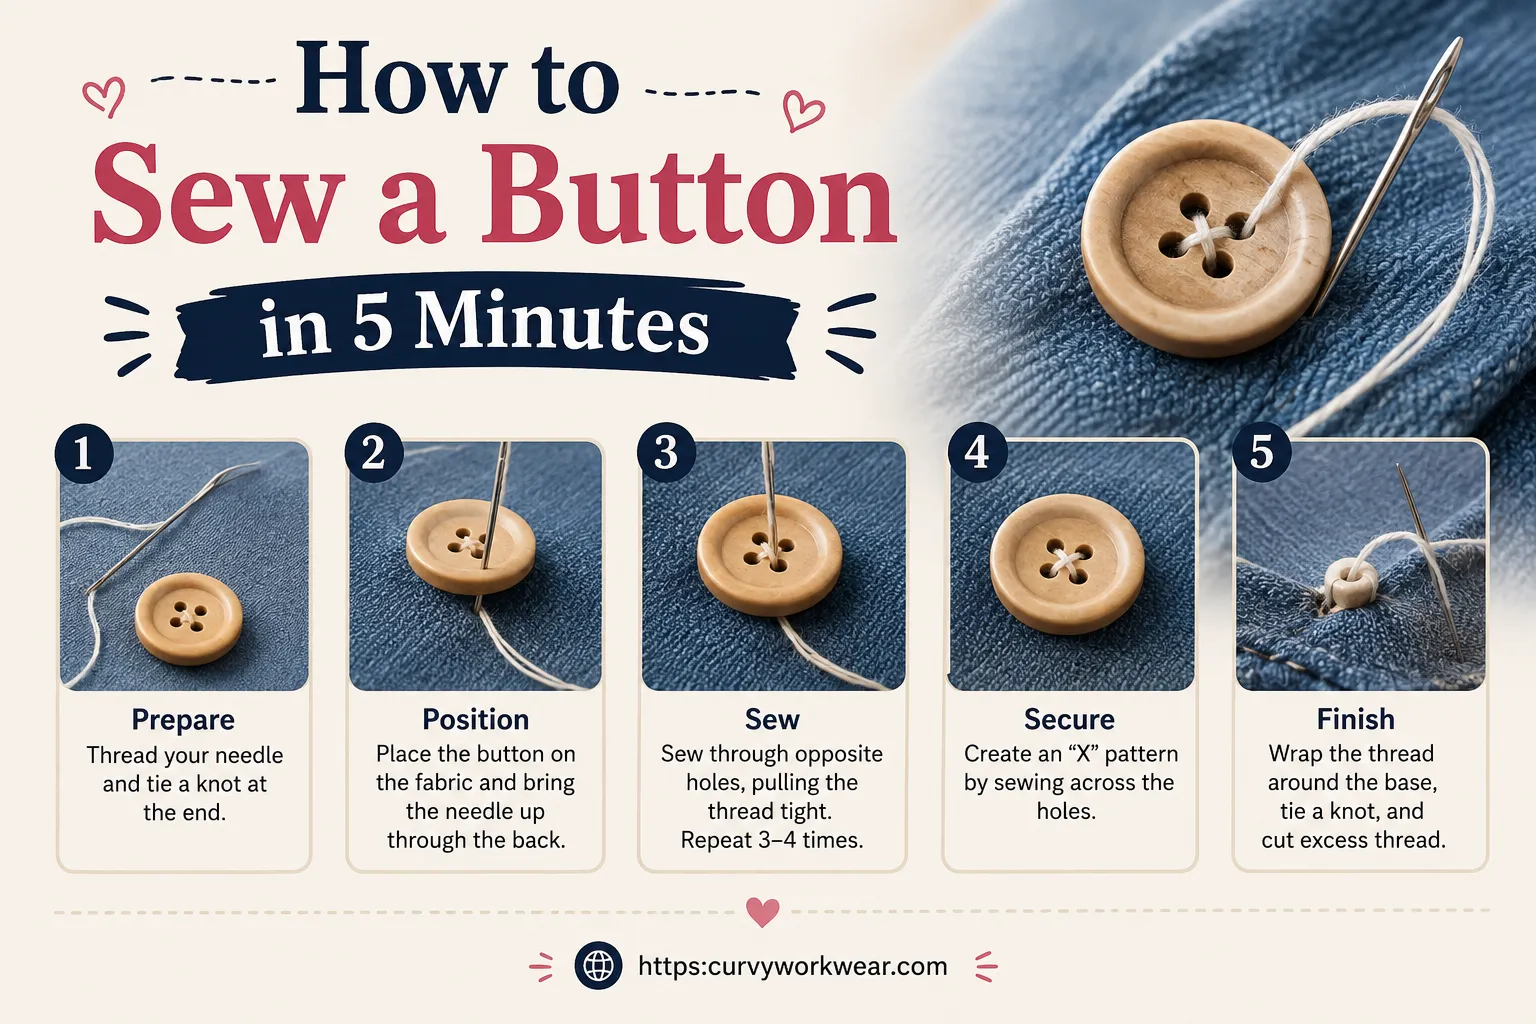
Cut a piece of thread about 18 to 24 inches long. This gives you enough length without too much extra to manage. Pass one end through the eye of the needle. Then pull the thread through until both ends meet, and tie a small knot at the bottom. Doubling the thread this way makes each stitch stronger. It also means you sew with two strands at once, which cuts your total stitching time in half.
Step 2: Position the Button
Hold the button where it belongs on the fabric. Look at the surrounding buttons, if any, to line up the height and position correctly. If you’re not sure exactly where the button goes, look for small leftover threads or a faint mark left by the old button. That’s usually your best guide.
Step 3: Make the First Stitch
Push the needle up through the fabric from the back, right where the button should sit. Pull the thread through until the knot catches on the fabric. Then push the needle up through one of the button’s holes. Pull the thread all the way through so the button sits flat against the fabric.
Step 4: Use a Spacer for Movement
Shirt buttons need a little space underneath them to move freely. Without this space, the button sits too tight, and buttoning the shirt becomes hard. Slide a toothpick, a matchstick, or even a spare pin between the button and the fabric before you keep stitching. This creates a small gap you’ll use later. Family Handyman recommends this same spacer trick to keep the button from sitting too flush against the garment.
Step 5: Stitch Through the Holes
Push the needle down through the opposite hole, through the fabric, and back up through the first hole again. Repeat this pattern 5 to 6 times. For a four-hole button, sew in an X pattern or two parallel lines, whichever matches the original stitching. Keep the tension even so the button doesn’t sit crooked.
Step 6: Create the Thread Shank
Remove the toothpick or spacer once your stitches are done. Now there’s a small gap between the button and the fabric. Wrap the thread around the stitches underneath the button, between the button and the fabric, about 3 to 4 times. Sewing machine maker Brother calls this wrapped section a thread shank, and notes it gives the button room to move once it’s buttoned.
Step 7: Tie Off Your Sewn Button
Push the needle through to the back of the fabric one last time. Make a small knot close to the fabric, then pass the needle through the knot itself for extra hold. Trim the extra thread with your scissors. Your button is now secure and ready to use.
How to Sew a Button by Hand Without a Kit
Sometimes you won’t have a full sewing kit nearby. Here’s how to manage with what’s around you.
Using Dental Floss Instead of Thread
Unwaxed dental floss can work as an emergency substitute for thread. It’s strong and often available in bathrooms or travel bags.
Using a Safety Pin as a Backup
If you truly can’t sew right away, a safety pin can hold a button in place temporarily. This isn’t a permanent fix, but it works in a pinch until you can sit down and stitch it properly. If you’re building out other quick fixes for everyday mishaps, our guide on how to tie a knot covers a few more handy tricks worth knowing.
Tips to Make Your Button Stay On Longer
A few small habits can help your stitching last through many washes and wears.
Match Your Stitch Count to Fabric Weight
Heavier fabrics like coats or jeans need more stitches, around 8 to 10 passes through the holes. Lighter fabrics like dress shirts usually hold well with 5 to 6 stitches.
Reinforce High-Stress Buttons
Buttons near the waistband of pants or the top button of a shirt collar take more daily stress. Adding a few extra stitches in these spots helps prevent repeat repairs.
Check Buttons Regularly
Loose buttons rarely fall off without warning. If a button feels wiggly, take two minutes to reinforce it before it comes off completely and gets lost. Good garment care habits like this pair well with other fabric care routines, like the steps in our guide on how to wash a wool blanket without shrinking it.
Common Mistakes When Sewing a Button
Even a simple task like this has a few common slip-ups. Knowing them ahead of time saves you a second round of stitching.
- Skipping the shank: Sewing the button flat against the fabric without a gap makes it hard to button and unbutton.
- Using thread that’s too thin: Weak thread snaps quickly under daily use, especially on coats or pants.
- Not knotting securely: A loose knot unravels after just a few washes.
- Ignoring button alignment: A button sewn slightly off from the buttonhole can strain the fabric and pop off again sooner.
For more quick clothing fixes and everyday how-to guides, browse our Daily Routines section.
FAQ: How to Sew a Button
What is the best thread for sewing a button?
Polyester or cotton-wrapped polyester thread works best because it’s strong and resists breaking. Try to match the thread color to your fabric so the stitches blend in.
Do I need a special needle to sew a button?
No, a regular sewing needle works fine for most buttons. Just make sure the eye of the needle is large enough for the thread you’re using.
How many times should I stitch through the button?
Most buttons hold well with 5 to 6 passes through each pair of holes, though heavier fabrics may need more. More stitches generally means a stronger hold, but too many can look bulky.
Why does my button feel too tight after sewing?
This usually happens when you skip the shank step and sew the button flat against the fabric. Next time, use a toothpick or pin as a spacer to leave room for movement.
Can I sew a button without a needle?
It’s difficult, but not impossible in an emergency. A safety pin can hold a button temporarily until you have proper tools, though it isn’t a long-term fix.
Conclusion
Learning how to sew a button is one of those small skills that saves real time and money. Once you know the steps, from threading the needle to creating the shank, the whole repair takes just a few minutes. Keep a small sewing kit at home or in your bag, and you’ll never have to toss a shirt over one missing button again. The next time a button pops, you’ll know exactly how to sew a button and get back out the door.